
How to deploy via Juju
Warning
This guide has been deprecated. Refer to the tutorials or the snap deployment how-to guide.
If an existing deployment uses this document, see the migration guide to update the deployment.
Prerequisites
This guide explains how to deploy and configure the Livepatch on-premises server using Juju and Charmed Operators. Juju is an Open Source Charmed Operator Framework that controls the full lifecycle of an application, including machine applications. Follow the installation instructions for the target system.
The Livepatch on-premises bundle must be deployed on machines running Ubuntu Focal.
No previous or advanced knowledge of Juju or Charmed Operators is required to follow this guide and deploy Livepatch.
Obtain the Livepatch authorization token
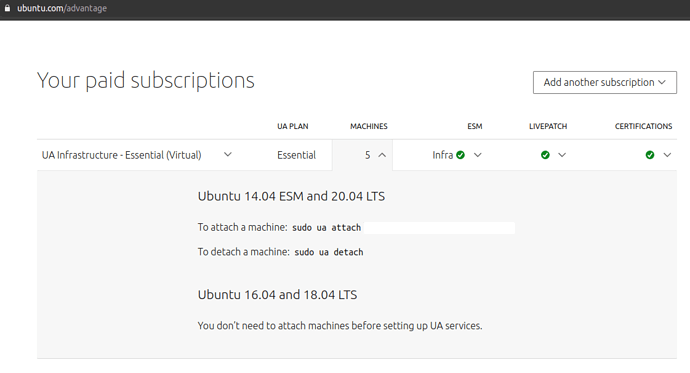
On-premises Livepatch Servers act as caching proxies for the Livepatch service hosted by Canonical. The subscription token is required to authorize the on-premises instance to pull patch information.
To obtain the Ubuntu Pro subscription token, visit https://ubuntu.com/pro.
Deployment procedure
1. Initialize Juju
Once the Juju CLI is installed, bootstrap a Juju controller to the target cloud. The Juju documentation provides detailed instructions for several clouds and machine types.
See the resource requirements for the virtual machines running Livepatch on-premises services.
2. Deploy the bundle
The bundle and Charmed Operators necessary to deploy the Livepatch Server are available at:
https://charmhub.io/canonical-livepatch-onprem
To start the deployment on a created Juju model, run:
juju deploy ch:canonical-livepatch-onprem
3. Configure Livepatch
After the deployment completes, verify the status of the model by running:
juju status
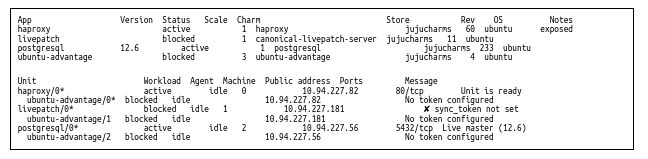
At this point the Livepatch unit is expected to be in a blocked state with the message: "✘ sync_token not set".
Provide the token, acquired by following the instructions in the authorization token section above, by running:
juju config ubuntu-advantage token="<token>"

juju run-action livepatch/leader get-resource-token --wait
The output should indicate the token has been successfully acquired:

After that, set the url_template setting as follows:
juju config livepatch url_template="http://10.94.227.82/v1/patches/{filename}"
The url_template specifies the URL where patch files can be downloaded by Livepatch Client agents. The URL template should be of the form http(s)://{HOSTNAME}/v1/patches/{filename}. The hostname is the only part that needs to be changed. The hostname can be the IP address of the HAProxy unit. If a DNS hostname is configured for the HAProxy IP address, that can also be used.
Deploy with a config overlay (optional)
These settings can be configured at deploy time by using a Juju bundle overlay:
juju deploy ch:canonical-livepatch-onprem --overlay config.yaml
The overlay file should have the following content:
applications:
  livepatch:
    options:
      url_template: <patch url template>
  ubuntu-advantage:
    options:
      token: <contract token>
4. Set up authentication
To enable admin tool access to the Livepatch Server, authentication must be configured. The simplest method is to enable username and password authentication.
Generate the password hash:
sudo apt-get install apache2-utils

htpasswd -bnBC 10 <username> <password>
username:$2y$10$74ZpDgHaxnUQo.AJZk1cMuSRfef5oK5xq5o/GLbUH/Bbw6W2bmctm
Use the output of the previous command to configure Livepatch:
juju config livepatch auth_basic_users='username:$2y$10$74ZgHaxn...UH/Bbw6W2bmctm'
See the Administration Tool guide for instructions on installing the administration tool and setting up authentication.
Once this has been done, the Livepatch admin tool can be used to authenticate:
export LIVEPATCH_URL=http(s)://{haproxy url}

livepatch-admin login -a [username:password]
5. Download patches
The final step before attaching client machines to the server is to download patches from Canonical servers. This can be done using the admin tool. See the Administration Tool guide for installation steps.
To download patches, run:
livepatch-admin sync trigger --wait
Enable machine status reporting
Each Livepatch on-premises instance can optionally send information about the status of the machines it serves back to Canonical. This functionality is opt-in.
The information sent back about each machine includes:
Kernel version
CPU model
Architecture
Boot time and uptime
Livepatch Client version
Obfuscated machine ID
Status of the patch currently applied to the machine’s kernel
To enable this reporting, run the following Juju command:
juju config livepatch sync_send_machine_reports=true
This can be disabled at any time by setting the flag to false.